Mounting and deploying amateur radio antennas is as much an art as a science. There are as many ways to mount or deploy an antenna as there are people who want to do this. Below I will cover some of the more common ways to mount or deploy antennas, as well as the considerations for doing so in different environments.
Antenna Location Considerations
When planning for your antenna deployment, there are a lot of variables to consider. Just a few of the things to keep in mind and know the answer to before you start are:
- Where will your antenna be located in relation to your radio?
- How far will your lead wire have to travel, and how much signal loss with result because of that distance?
- Do you have any structures nearby that will cause interference or other negative effects on your signal?
- Will the location you picked by a safe place to deploy the antenna with no chance of someone getting hurt (not somewhere they could touch it while you are transmitting)?
- What type of propagation will you be using? Line-of-sight, NVIS (Near Vertical Incidence Skywave), Ground Wave?
- Will this be a temporary deployment, or a permanent installation?
- How will you get to your antenna once it is deployed if you need to work on it, or adjust it?
- If a permanent installation, are the antenna and feedline rated to handle the elements (water, hot, cold, UV light)?
- If a permanent installation, is there any way the antenna could hurt someone or something if it fell down, like in a storm?
- Where and how will you establish a ground for the antenna/coax?
Deploying Antennas
Using Antennas with Trees
When installing wire antennas, trees can be a help or a hazard. If there is enough clearance between the trees for a straight shot from your radio to the top of a tree without the wire touching anything else, use that straight line and put up a wire antenna. Something like an EFHW (end-fed half-wave) or OCFD (Off-Center-Fed Dipole) depending on how you are able to get the wire in the air and where your feedline will originate from. Shooting a wire up into a tree temporarily with a slingshot and some fishline to deploy an EFHW is a very popular way to deploy an antenna for POTA (Parks on the Air).
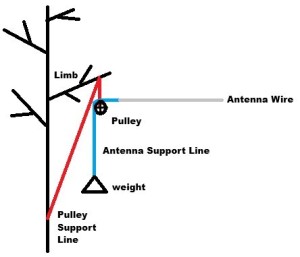
If you are going to run a wire up into a tree and over a branch that will be more permanent, it is best practice to use a pulley of some sort. A tree limb can act as a pulley temporarily for short deployments, but this not ideal for permanent installations since over time the rope will move back and forth over the limb like a saw and cut into the limb and eventually break or become stuck. With the pulley method, a counter weight is used on one end of the antenna wire with a piece of rope (see my poorly drawn example below). The antenna support line isolates the antenna from the pulley or tree limb, and keeps the wire from pulling tight and breaking when the wind blows which causes the tree to sway. The pulley and counterweight method will allow the tree to move while keeping normal tension on the antenna wire antenna. You can accomplish almost the same thing by simply allowing the antenna wire to sag some in the middle so it is not easily pulled tight and has some room to loosen or tighten without breaking or sagging too low.
One method to get your antenna in the air is to use a slingshot to shoot a small lead weight with some fishing line attached over a high limb, then attach your antenna support line and pull the wire up. If you want to use a pulley, just pull the pulley up (with the antenna wire attached to a rope and counterweight) already threaded through the pulley, and then tie the pulley’s rope to the tree at the bottom with enough extra rope coiled so you can lower it later if needed. You now have the pulley high in the tree and tied off at the bottom so you can lower it, and you also have another line going through the pulley that can have a counterweight (you can use something as simple as a brick or bottle of water) on the bottom to keep tension on the antenna wire.
If you don’t have enough clearance for a long, straight shot, but you do have a tree close to your house/radio, you can use an inverted V dipole antenna. Just make sure you get the balun as high as possible, and leave enough clearance on the ends of your wires to make sure there’s no chance of them coming into contact with someone while you are transmitting.
Mounting Antennas
House/Building Mounted Antennas
For a lot of people, mounting the antenna high up on your house is the best case scenario, especially when it comes to cost versus value. When mounting an antenna on your house, there are 4 main methods: Roof mount, Eave mount, attic mount, or a pole that mounts to the side of the house for support. All of these types of antenna mounting are pretty inexpensive, don’t require guy wires, and are very stable. If you’re in a 2 story house, the roof peak is probably 25 – 30 feet in the air. That’s not bad at all. Below I will go over some methods of mounting an antenna to/on a house or building.
Roof Mounts
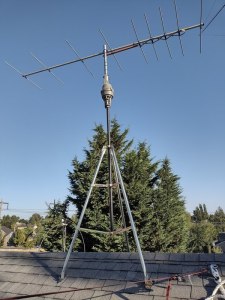
There are 2 main types of roof mounts, penetrating, and non-penetrating. Penetrating roof mounts, as the name implies, require a fastener to penetrate the roofing material to hold them in place. Non-penetrating mounts just sit on the roof and do not have any part that goes through the roofing material. Most roof mounts are the penetrating type since a house roof is usually slanted, and the mount needs to stay in place in high winds. However, there are some that will use sandbags or other weights to hold the mount in place so no screws are needed. Which one you need will be determined by 2 factors; whether you have a flat or slanted roof, and what type of mount will be physically required to hold your antenna. One style of roof mount is the Tripod Roof Tower like the TRT60 by Rohn.
Pole Mounted Antennas
Some of the more common poles used by radio operators for antenna poles would be a pole such as using chain-link fencing top rails to make an antenna pole, or using a Heavy Duty 30 Foot Flag Pole, or a 30 foot Telescopic Extension Pole for painters, or some other type of pole that is repurposed as an antenna pole. There are poles made specifically for mounting antennas like the EASY-UP 27 foot Telescoping Mast or fiberglass extendable poles used by many amateur radio operators.
Fencing Rail Antenna Pole
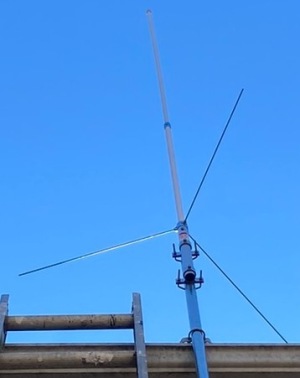
You can build a simple antenna pole from common supplies in most areas. The easiest is to get toprail from a home supply or fencing store. It is usually called toprail or “chain link fence rail”. It is 10-1/2 feet long, and 1-3/8 inch in diameter. It comes in different gauges, but anything 17 gauge or thicker (16, 14, etc.) is fine. You can get this top rail galvanized or coated, which are both rated for outdoor use. As long as you attach the pole to your house somewhere close to the top, it should be fine without having to use guy wires. The picture below shows the first time I mounted my Tram 1480 dual-band antenna. This was at 20 feet, and it was a little close to the gutter for my liking, so I later raised it to around 24 feet by cutting one of the pole sections, adding an additional support to the middle of the pole, and adding a full 10 foot addition.
When installing a pole for an antenna, I usually dig a hole about a foot or two deep and sink as much as I can of the bottom of the pole into the ground. Always place the non-crimped end of the first pole into the ground, so your crimped end is facing up to accept the next pole. This will allow any water that rolls down the inside of the pipe to have a chance to get out. Don’t add cement inside the pole, or under it as this will just cause any water that gets into the pole to get caught and rust the pole out from the inside. Once I have my 2 – 3 sections of pole up, I make sure I don’t have any joints in the pole that are above, or very close to, my support bracket. If a joint will be within 1 foot of the support bracket, consider cutting at least 1 foot off the lower pole on the large, uncrimped end to place this joint farther away from the bracket. If you cut the pole, be sure always cut the non-crimped end, and be sure to paint the cut end to protect it from rust. I also never leave more than half of the pipe above the support bracket. You can add one final short section of pipe above the bracket if your antenna will have a small surface area, and isn’t too heavy. This section will be supported only by the 6 inch overlap in the pipe, so be cautious if you do this to get a little more height. I also advise you drill a small hole through the coupling area of the last joint if it is above the bracket and put a self-threading exterior grade screw into it to attach it to the rest of the pole and to keep it from being able to rotate if you have any kind of directional antenna mounted to it. Don’t forget you will also need a ground rod to correctly ground the pole and antenna.
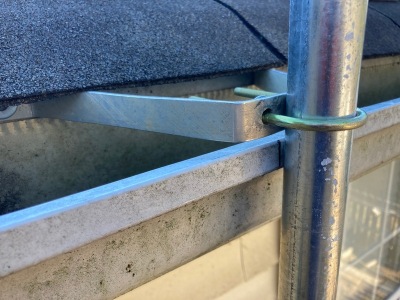
To attach the antenna pole to your house, there are several commercially available mounts you can buy, or, if you have the tools and skills, you can just fabricate one. Below is a picture of one I made from some aluminum from an old road sign. The screws in the picture were just to get the initial placement correct. They were later replaced with 1/4″ lag screws.
The Skywalker 4” Heavy-Duty Wall Mount Pair for TV Antenna Mast is a good offset for fascia board mounting if you don’t have gutters. If you need more of an offset due to gutters or some other reason, you might need to consider the XRDS-RF Heavy-Duty Stand Off Antenna Wall Mast Mount. These come in several offsets from 6 – 16 inches. Keep in mind if mounting to the fascia boards you need to make sure at least one of the lag bolts goes into a piece of roofing lumber, not just the fascia board itself. If you are able, another mount half-way down coming from the side of the house would help tremendously to keep the pole from being able to get too much sway in high winds, which could possibly sheer the bolts or break the mount. If you’re only up 20 feet or so, or have a unidirectional antenna without much surface area, this isn’t as much of an issue.
Towers
Without a doubt, a tower is a radio operator’s dream for a permanent installation. It drastically improves your coverage area for line-of-sight, and helps get you above certain sources of interference like structures, trees, electrical wiring, etc. Towers however, can be expensive. First, there is the cost of the hardware itself. The price for a new tower will start around $200 per 10 foot section and more for the top section of the tower. Used towers can be “free” if they are still standing, or run hundreds if they are on the ground. Next, there is the cost to install the tower. Most towers over 20 feet will require some form of foundation. The requirements will be spelled out by the tower manufacturer, but some common requirements are either a 3’x3’x3′ (HxWxD) foot cement base with rebar and a section of tower embedded in it, or even a larger cement base for taller or heavier wind load towers.
If the tower isn’t self-supporting, you will also need some kind of guy wire, or a way to attach it to something like a building to help support it in high winds. If you need guy wires, you will also need room for those wires somewhere, most likely on the ground unless the tower will be mounted on a rooftop, like on some buildings. If you are thinking about getting a tower, I HIGHLY recommend you find someone who has built one before to help “Elmer” you, or hire a professional to handle everything for you. Towers are not a good place to use the “trial-and-error” method due to the potential for life-threatening harm or damage to property.
Lastly, do yourself a favor, if you don’t have training or experience taking a tower down, don’t ever buy a tower from someone that is still in the air, and try to take it down yourself. That’s a really good way to end up hurt, dead, or at the very least damaging some property. If you see a tower that is still up that someone is offering for free, that is the reason it is free. The chances of something going wrong when taking one down, especially if it has been up for a while, or isn’t in good condition, are very high.
I hope this article was helpful to you.
73,
N4MCP


